If you have already chosen hosting for your website, here comes the next and equally important step. Setting up a blog. If you want, creating a website. Having your own blog for free is certainly a tempting proposition for most people. Believe it or not, it’s not complicated at all. With our detailed guide, (almost) anyone can do it. We’ll give you the answer to the common question, how do I start a blog?!
If you prefer video-content, we highly recommend our extensive WordPress video-tutorial, which walks you through most of the steps below on how to start a blog in detail (please don’t forget to turn on English subtitles)
The first step is to register the domain, including setting up hosting (using the example of the provider Wedos). After that, you will learn how to simply install WordPress. Thanks to the instructions you will configure it yourself, choose a suitable template, create a website and write your first blog post (or website). Let’s get started!
The four most common questions about starting a blog
Is it easy to start a blog (not only) on WordPress?
Yes, setting up a blog is an effortless affair thanks to the intuitive tools available today. Our guide will take you through setting up a blog on WordPress, step by step.
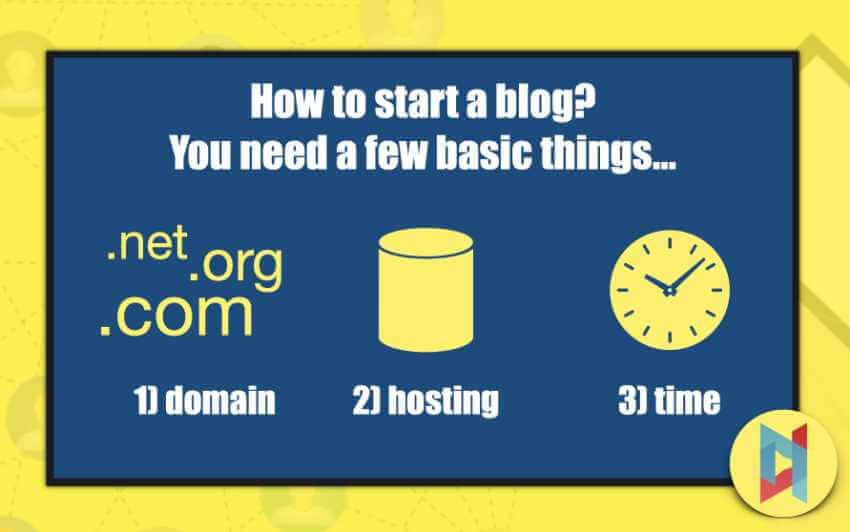
What all does it take to run your own blog?
You don’t really need much – you just need to start with 3 simple steps: setting up your own domain, then hosting suitable for running WordPress, and at least few hours of your time.
How much does it cost roughly to run a blog per year?
Running a blog will not burden you financially 🙂 It can cost a few tens of EURos a year with all that. But it also depends on what kind of blog you are setting up and what goals you are setting for it.
Are there any discounts available?
Of course, in the Discounts and Coupons section of our website you will find regularly updated codes for 50% off hosting and some domains – these will come in handy when you start a blog.
First step – domain registration and hosting
Now we will show everything on the example of one of the most reliable providers of domain and hosting services – Wedos.
Domain (domain name)
Before registering a domain (or domain name), you should first think about whether your website address will be practical. The first important factor is the length of the name (number of characters). A shorter length is usually easier to remember and vice versa. If the name will contain more words, the option of separating them with a hyphen is suggested (e.g. michelle-wordpress.com). This may not always be a suitable solution. There is a hyphen (i.e. a short horizontal line) and a dash (a longer horizontal line). Therefore, it is enough for your potential visitor to type a hyphen instead of a hyphen in the address bar and your website will not be displayed. A better solution is to register both. The domain name should also contain a keyword related to your activity (e.g. auto repair shop), ideally the location in which you operate (e.g. Indiana) – the final address of the site can look like this: indianacarrepair.com or carrepair-indiana.com. Often people are wondering which ending to choose – whether .com, .org, .net or other. If your website is written in ENG and you intend to dedicate it exclusively to the ENG audience, we recommend choosing the .com extension, which is usually used and “experienced” in the english speaking countries. If you are setting up, for example, a personal portfolio, you can use the address with your own name: michellekaczor.com.
Domain registration (using Wedos as an example)
Now you have a crucial step to take. Registering your domain and setting up hosting. We will present this process to you using the example of Wedos, a trustworthy and quality hosting/domains provider. We use it ourselves and have had great experiences with it. Therefore, we can recommend it with a clear conscience. However, if you are interested in other providers, you can read the lesson about how to choose best WordPress hosting.
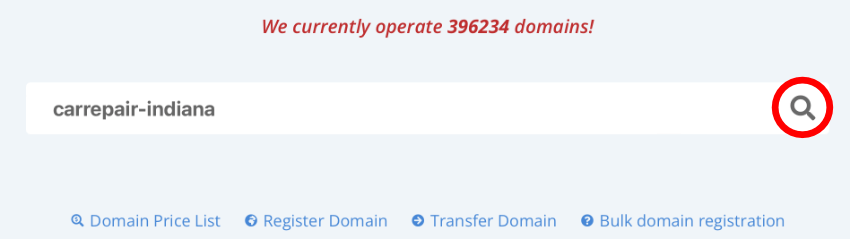
1) Open Wedos in a new window and enter your intended domain name (in our case, carrepair-indiana) in the “Put the Domain Name and Press Enter” box, click on the magnifying glass symbol or “Check Domain Availability” and it will check if the domain name is taken or not. If it is available, congratulations. The system will show a green checker (pipe) and you can click on the “Buy Now” button.
2) In the first step of ordering a domain, you will be presented with a form in which you fill in some basic information. The “Domain Name” field will be pre-filled with your chosen domain name. Next, in the “Registration Period” field, you will select the length of time you want to own the domain. If you are serious about your domain, we recommend choosing the highest number of years (the price will be lower as a result). If you just want to experiment with domain name, you can leave the default 1 year. In the next field “Select Webhosting” you can select “Order Webhosting NoLimit”. You will complete its order right after completing this one, and the whole process will then be easier. You can also choose additional services. Among these, the WEDOS EWM Monitoring is useful.

3) After agreeing to all the conditions (checking the boxes before the “Continue” button), you will find yourself in the second step of the order, i.e. “Settings”. Here it is a good idea to leave all the default values (as recommended by Wedos itself). So you won’t change anything on the page at all. You just tick “I agree with the terms of the registration of domain names” and click on the “Continue” button.
4) In the third step of the order, you will fill in the registration details for your new Wedos user account. If you already have an account, just log in. The fourth step of the order will ask you to enter the domain owner’s details. In the fifth step, you will then fill in your billing information and in the last, sixth step, you will complete the entire registration process. Please remember that your domain will only be active when you pay for it. Until then, anyone can “beat you to it”.
SUPER! Now you need hosting and that’s it.
Setting up hosting (on the example of Wedos)
In cooperation with Wedos, we have prepared an extra promotion. 50% discount on the price of NoLimit web hosting when you enter the following discount code in your order: WN232OVSAN. Detailed information about hosting and all important context can be found in the lesson about how to choose best WordPress hosting.
1) Open your NoLimit web hosting order – at this point you should already have a domain established (previous subsection).
2) In the first step of the order you will, similar to the domain ordering process, fill in basic information. In the “Domain” field you will enter the domain you have purchased (in our case the sample domain indiana-carrepair.com).
In the next section of the order it is the turn of “The optional services” and “PHP version”. Of the additional services, we definitely recommend choosing HTTPS support – currently there is no tariff for it anymore. This allows you to run a secure connection within your domain, which is nowadays one of the basic indicators of the trustworthiness or respectability of a website. You can leave the PHP version at the offered value (currently 8.2+).
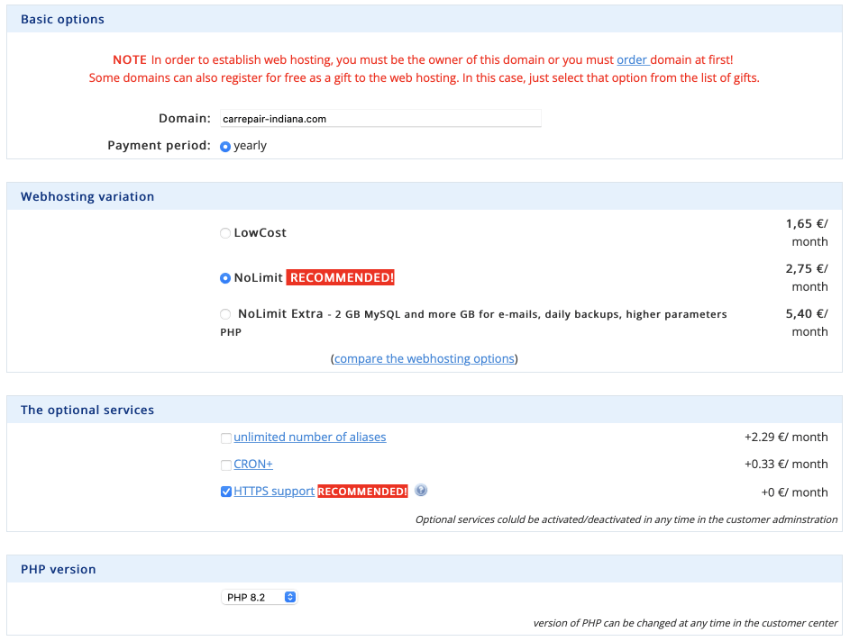
PICTURES HERE
In the “DNS Settings” section, leave the Set the records at DNS servers WEDOS option checked. Almost at the end you will find the “Discount Coupon” section, where you can enter our discount code: WN232OVSAN, which will get you 50% off your web hosting order (you will probably already have it filled out if you clicked on the link above). Next, agree to the terms and conditions (check the boxes before the “Continue” button) and move to the second step of the web hosting order. The procedure is now exactly the same with the one we described in the previous subsection called Domain Registration (points 3 and 4).
Wedos email – how to easily set it up and sign up?
If you are setting up your own blog, or any other type of site, you will appreciate the option to have your own email address. In the case of Wedos, you can set one up very quickly and easily.
Just open the administration of your Wedos customer account, select -> Hosting Services -> Webhosting -> then click on the name of your hosting (e.g. for us it is mojewebovka.cz).
You will then see the complete web hosting setup options and you will be interested in the tile called Email boxes. In it, click on Manage mailboxes and then on Create new mailbox.
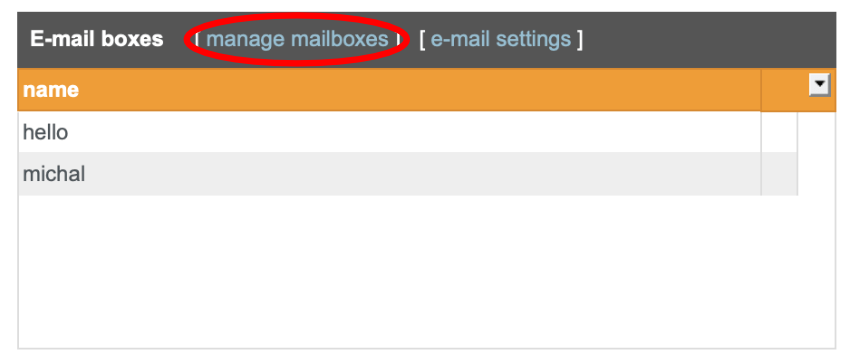
Then you can easily create your own mailbox, which will have the extension of your webhosting – in our case it is for example @mojewebovka.cz.
It is very easy to log in to your Wedos mailbox using the Wedos Webmail system – with the login details you entered when you created the site.
If you want to learn more about this topic, check out our article How to set up an email with your own domain?
CONGRATULATIONS! You’ve done the hardest part.
WordPress installation and configuration
Installing WordPress (using Wedos as an example)
Installing WordPress in the Wedos administration is easy and you can do it before you know it. First, log in to your customer administration. Click on “Web Hosting” in the top tabs.
You will then see a “List of Hosting Sites”. In it, you will see your domain name – click on that to open your web hosting settings. Notice the column on the left. Almost at the end of it you will find the “Application Installer” item. Click it and it will open up specific options.
On the page that appears, you will be offered different systems to install. You click to choose WordPress from among them. You will then be shown the installation details, in which you click on “Install New Application” in the “Install New Application” passage. We recommend that you install the latest version of WordPress available.
Now it’s your turn to choose where you want to install WordPress. If you want to install WordPress directly into the main directory, you don’t need to change anything. The drop-down boxes will just say “http://” (or “https://” if you have an encrypted connection active) and “yourwebsiteadress.com” (in our case “mojewebovka.cz”). Then click on the “Continue” button.
We are slowly coming to the end. You will need to enter the basic information for the installed WordPress. Specifically: installation language; username; password; email; site name; site description and the option to limit incorrect login attempts. As for the admin username, we highly recommend not leaving the default name “admin”. This is because it is a worldwide convention to use it. If any website becomes a target for hacking, this is usually one of the first usernames that is tested by hackers and can make it easier to break into the site. It is therefore more appropriate to use e.g. “Irene”, “Joseph” etc.
Once you have completed the previous step and clicked “Continue”, you will only need to check the summary of your request and the installation process itself. After entering your website address into your browser, you should now see the basic WordPress blogging page. It should be added that you can find the administration of your site at www.yourdomain.cz/wp-admin. Use the Username and Password you entered in the installer to log in.
GREAT! You’ve done the WordPress installation. Your first website is up and running!
WordPress configuration
You already have WordPress installed, so log in to the WordPress administration if you haven’t already (usually at: www.yourdomainname.com/wp-admin). First of all, we’d like to note that WordPress has a variety of configuration options. We’ll cover the very basic ones at this point. Namely, the “Settings” section in the Left Menu of the WordPress administration, which acts as the main menu. The settings section contains the following subsections: 1) General, 2) Writing, 3) Reading, 4) Discussion, 5) Media, 6) Permalinks, 7) Privacy. We will now address these.
PICTURE HERE
1) GENERAL – in this subsection, the most important items are the first two, i.e. “Site Title” (in our case: MojeWebovka) and “Tagline” (in our case: WordPress Website Creation for all). The Title of the site will likely include the name of your website or the name of your company. The site description (or Tagline) is then used to let visitors to your blog know what it’s about. The description should not be lengthy. Just briefly describe the essence of the website. If you don’t have a specific idea at this point, you can come back here anytime and add items later.

2) WRITING – you will visit this subsection rather later, when your blog is a work in progress. This is because you won’t find the option to set the “Default Post Category” and “Default Post Format”. This may help to make blogging more efficient, but it’s not essential for you at the moment.
3) READING – Of the more important settings options, this subsection allows you to specify what your Hompage displays. You can display “Your lastest posts” or “Static Page”. There are two subsections. One is Homepage. That is, the default page that will be displayed first when you enter your site address. Next comes the ability to specify a Posts page (similar to “Your lastest posts”). You will learn how to create Pages and Posts later (later in this tutorial). You can return to this subsection whenever you need to.
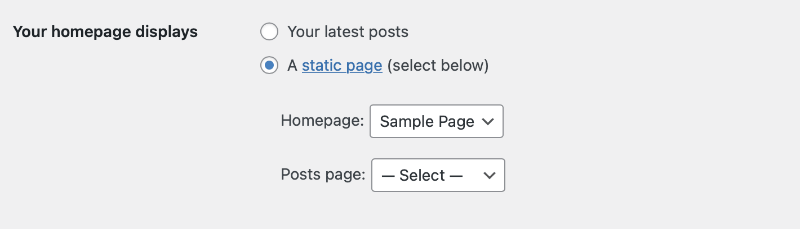
Also, be sure to note the “Search Engine Availability” option at the end of the subsection. If you check it, it means that browser robots will be prohibited from crawling and indexing (i.e., registering for display) the site. WordPress points out that it is up to the search engines to honor this request. However, it is an unwritten rule for robots to respect these requests. We recommend activating this setting especially in situations where you are just creating a website and don’t want it to be displayed anywhere.

4) DISCUSSION – this subsection contains everything related to comments on your site. At the moment when you are just starting out with WordPress, it is advisable to pay particular attention to whether (not) you want to allow people to add comments and whether (not) comments should be manually approved. There are, of course, a number of other options. However, even the default settings should work fine.

5) MEDIA – this is where you’ll come in if you’d like to change the default cropping settings for the media (images) you’ll be embedding on your website. You can specify specific dimensions for thumbnail, medium and large sized images here. Alternatively, leave the defaults as they are.
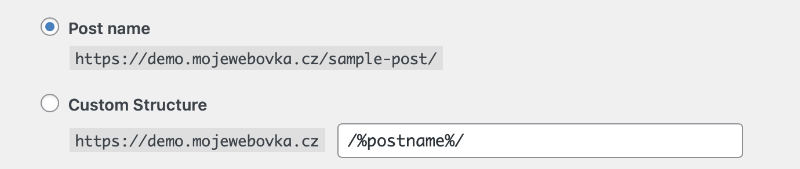
6) PERMALINKS – You encounter permanent links every day in the Internet environment without even realizing it. They are specific forms of web addresses that uniquely identify a page (or post). That is, the site URL/identifier of a particular page or post. Simply put: try looking up in your browser’s address bar now (i.e. while you’re on this tutorial page). You will find this address: https://mojewebovka.cz/en/wordpress-tutorial/how-to-start-a-blog/. It uniquely identifies this our tutorial you are reading and no other site can have it.
You have several options for the shape of the identifiers of specific pages after the slash (e.g., a numeric variant, the post name, or the custom structure). We highly recommend choosing the post name option because it’s easy to use, looks nice, and it will help you in terms of SEO (optimizing your site content for search engines like Google). Keywords related to the content of the site are usually already in the address itself, which is attractive to search engines and they will rank your site better.
BEWARE of the situation where you decide to change this setting later for some reason (at the moment you have already published some pages and posts). This move may result in broken links.
7) PRIVACY – this subsection exists in WordPress in connection with GDPR (General Data Protection Regulation). This is the place to create a page that will define your privacy policy. However, as WordPress itself states, it is up to you to use these resources correctly, or to provide site visitors with the information that your privacy policy specifically requires, and to ensure that this information is up-to-date and accurate. So consider (or consult) whether your business requires a privacy policy definition and take the necessary steps accordingly.
FINAL TIP – if you want to upgrade or reconfigure your user profile, there is nothing easier than going to the “Users” section and “Profile” subsection in the Left Menu of the WordPress administration. The information you fill in here is sometimes displayed directly on the website. A typical example of this is a blog where you contribute regularly and your individual posts are displayed as their author (if the template has it set up that way). So go through your entire user profile settings and make sure everything is in order. You can easily fill in the missing information. And delete them later as well.
EXCELLENT! You’re done with the basic WordPress configuration. Nice going ????
WordPress themes and their selection – one of the key topics in the question of how to start a blog
The basics are to visit the “Appearance” section and the “Themes” subsection in the left column of the WordPress administration. This is where all the management of your templates takes place. You’ll see both the template you have active now (in our case it’s Astra, as you can see in the illustration), but also a list of other templates. If you’re freshly installed WordPress, you’ll usually find a few basic templates directly from WordPress. However, most users are not satisfied with these and in the plenty of different WordPress themes available. Customizing the look of a blog is one of the most interesting and fun activities of the whole process. When you’re ready, click the “+ Add New” button at the top of the page. You will then be able to choose from thousands of different templates that are ready for WordPress.
During the process of selecting themes for WordPress, you can hover over the thumbnail of a particular template to see two options – either to “Install” the template directly and then “Activate” it for use, or to view a “Preview” of the template to get a rough idea of what it will look like. It should be noted that in the preview, the template may not always look exactly like what you see in the thumbnail. However, that’s okay. Once the template is activated, you will gradually start filling it with content and changing its layout. This way, you can customize the template to your exact
liking. In addition, you can specify the “Desired Features” of the search – that is, for example, tick that you are only looking for templates suitable for Blog. We recommend simplicity and clarity just for Blog and other types of websites. Some templates can be “cluttered” and visitors to your site might be put off by the look alone. So take into account the simplicity factor of the design. If you’ve already found “the right” template, you can use the “Appearance” section and “Themes” subsection in the Left Menu and then “Customize” button in theme preview to reconfigure various elements of the template to make it “your own”. Be sure to also check out the lesson in our tutorial called WordPress Templates, where we discuss this topic in more detail.
YOU’RE DONE, CONGRATULATIONS! Now there is nothing stopping you from publishing your first BLOG post.
Creating pages and publishing contributions
Creating pages in WordPress
First, open the “Pages” section in the left column of the WordPress administration, which acts as the main menu. There, by default, you will find a Sample page, which you can delete directly by hovering over this area and clicking on the “Trash” option. There is no need to create any new pages for now, however, it is good to know about this section when you want to come back here in the future and create, for example, an “About Us” or “Contact Us” page. If you want to create a new page, there is nothing easier than to click on the “Add New” option in the Left Menu, or directly above the overview of the pages you have created in the “Pages” section.
Creating posts in WordPress
However, posts are an essential part of your blog. As with the “Pages” section, just click on the “Posts” section. Again, you will most likely find a default, test post (Hello world!), which you can delete by hovering over the area and clicking on the “Trash” option. Next, select “Add New” in the Left Menu or directly above the list of posts you have created in the “Posts” section. You are now ready to write your first blog post. First, you’ll need to write the title of the post (in our case: “My first blog post”). It’s a good idea to use an important keyword related to the post in the post title right away. Next up is writing the post itself (in our case: “This is my first BLOG post. YAY!”). The editor environment is intuitive and all common formatting options are available (e.g. italics, bold, bullets), including media insertion (e.g. images and videos).
In the right-hand column you have a number of options. For example, selecting a preview image for your post. Or selecting the section your post belongs to. Categories group together common topics of posts (e.g. nature, city, other, etc.), and we recommend that you create them and organize your articles into them. This will help make your blog more readable, especially when there are hundreds or even thousands of articles. When you are done with everything, you will also find a “Publish” option in the right column. This is how you “launch” your post into the ether. You also have the option to set the (in)visibility of the post or schedule the time of its publication. That’s all.
If you have any further questions about how to start a blog, check out the other chapters of our guide
Starting a blog is a very complex topic. We hope that the guide has helped you in being one step closer to having your own and dream blog. If you need more information, be sure to check out the other sections of our WordPress Tutorial as well. It’s also a fact that WordPress may not be the “right fit” for every user. For example, some may find it too complicated, cluttered, etc. For such users, simpler, more minimalist web development systems such as Wedos WebSite or Webnode (detailed in our personal review) are more suitable. These are by their nature designed for undemanding users who do not want to “bother” with lengthy web development, studying tutorials and difficult procedures.
YOUR FIRST WORDPRESS BLOG IS READY! CONGRATS! We also recommend you to follow the other lessons of our WordPress tutorial.